Template Editor
The  Template Editor in RigBridge is a powerful tool designed for creating, modifying, and managing templates that serve as standardized plans. It ensures that your organization maintains a single source of truth, consolidating best practices, operational learnings, and procedural instructions into structured templates.
By using the Template Editor, you can create and manage project templates, either manually or—if available—through third-party integrations, ensuring that the correct instructions are applied to every project.
How it looks
When you open the Template Editor , you will see a structured layout designed for editing and managing templates efficiently. The interface consists of the following key components:
Task Overview
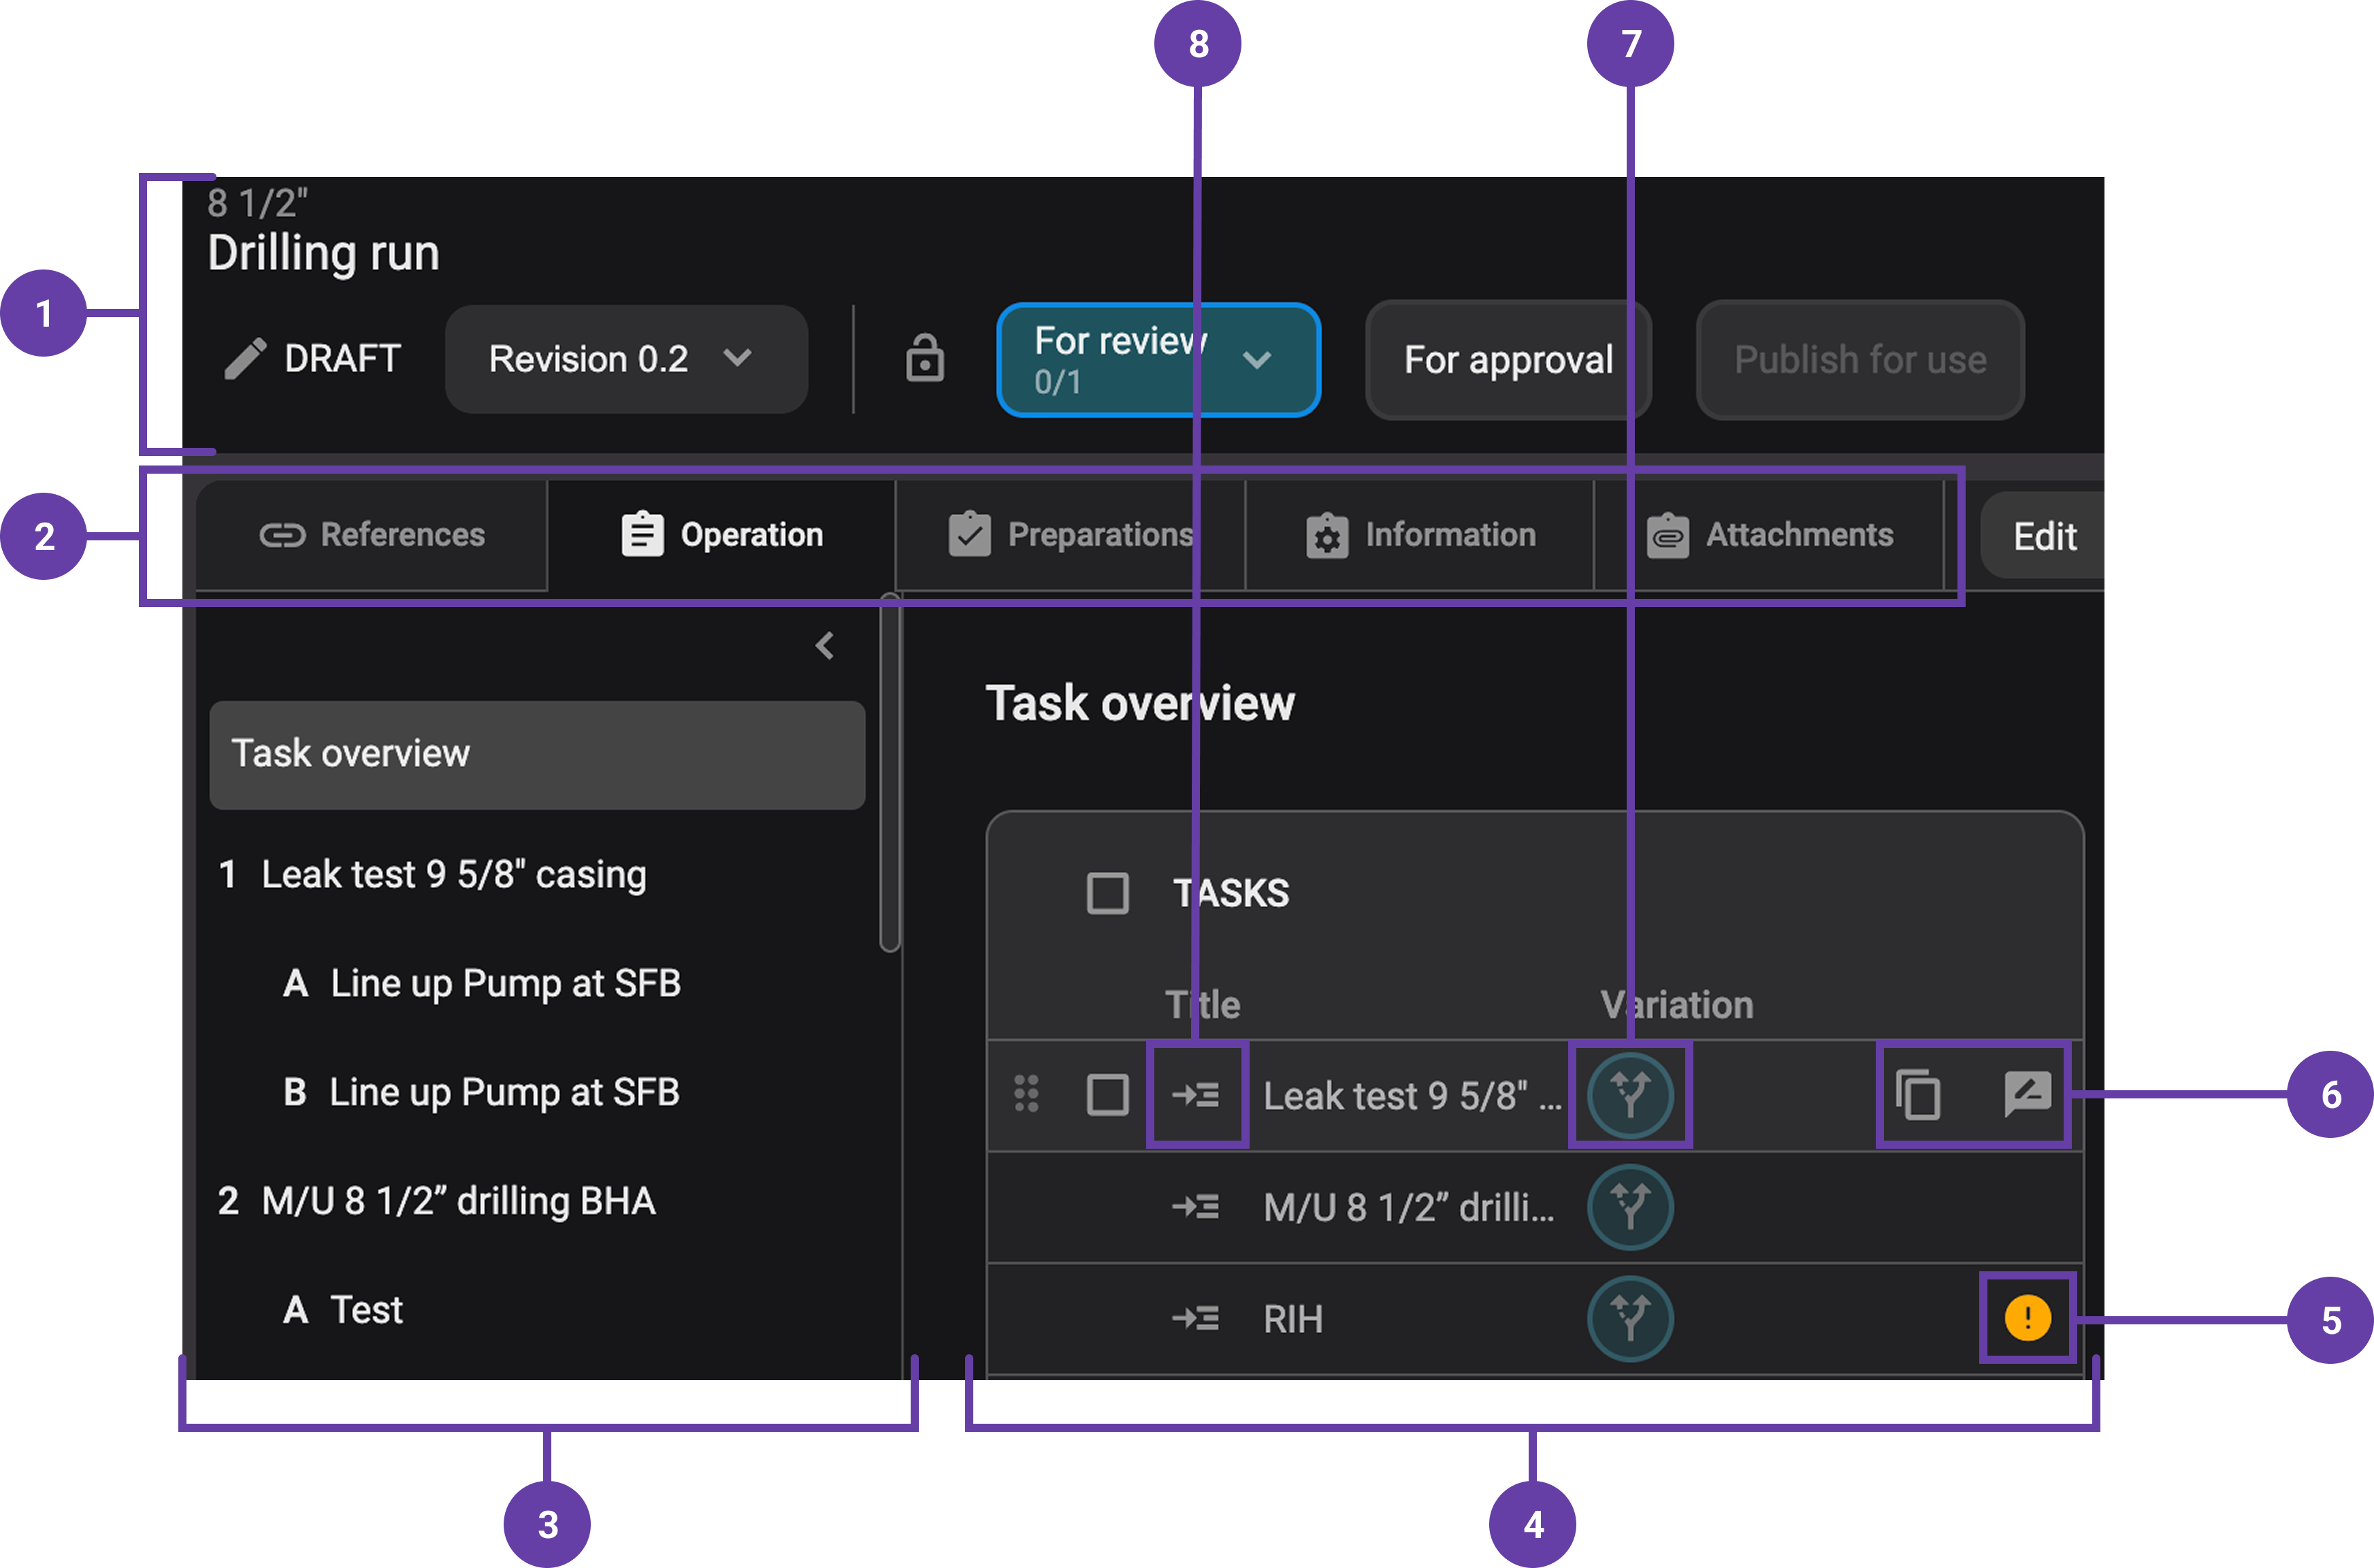
Header: Displays the template name, revision history, and available actions such as sending the template for review, approval, or publishing the template.
Tabs: When you open a task in the Template Editor, you start in the Operation Overview tab by default. Click a tab header to switch views—these tabs work similarly to those in the Plan editor.
Task and Step Hierarchy: A structured tree view showing tasks and their related steps, which can be expanded or collapsed for easier navigation.
Template Overview Panel: Displays all tasks and steps imported from the third-party integration.
Notice
Integrated tasks are read-only, but steps can be edited.
Validation Panel: Highlights errors or missing information that must be addressed before finalizing the template.
Step Action Buttons: Includes options to
 copy,
copy,  add reviews, and
  validate steps within the template.
Variation Column: Allows users to add or manage variations, for example, Rig or Concept.
Go to Step Button: A built-in editor where users can modify instructions, parallel activities, operational parameters, risks, and mitigations.
Step Overview
Once you click  Go to Step, the interface changes to focus on a single step:
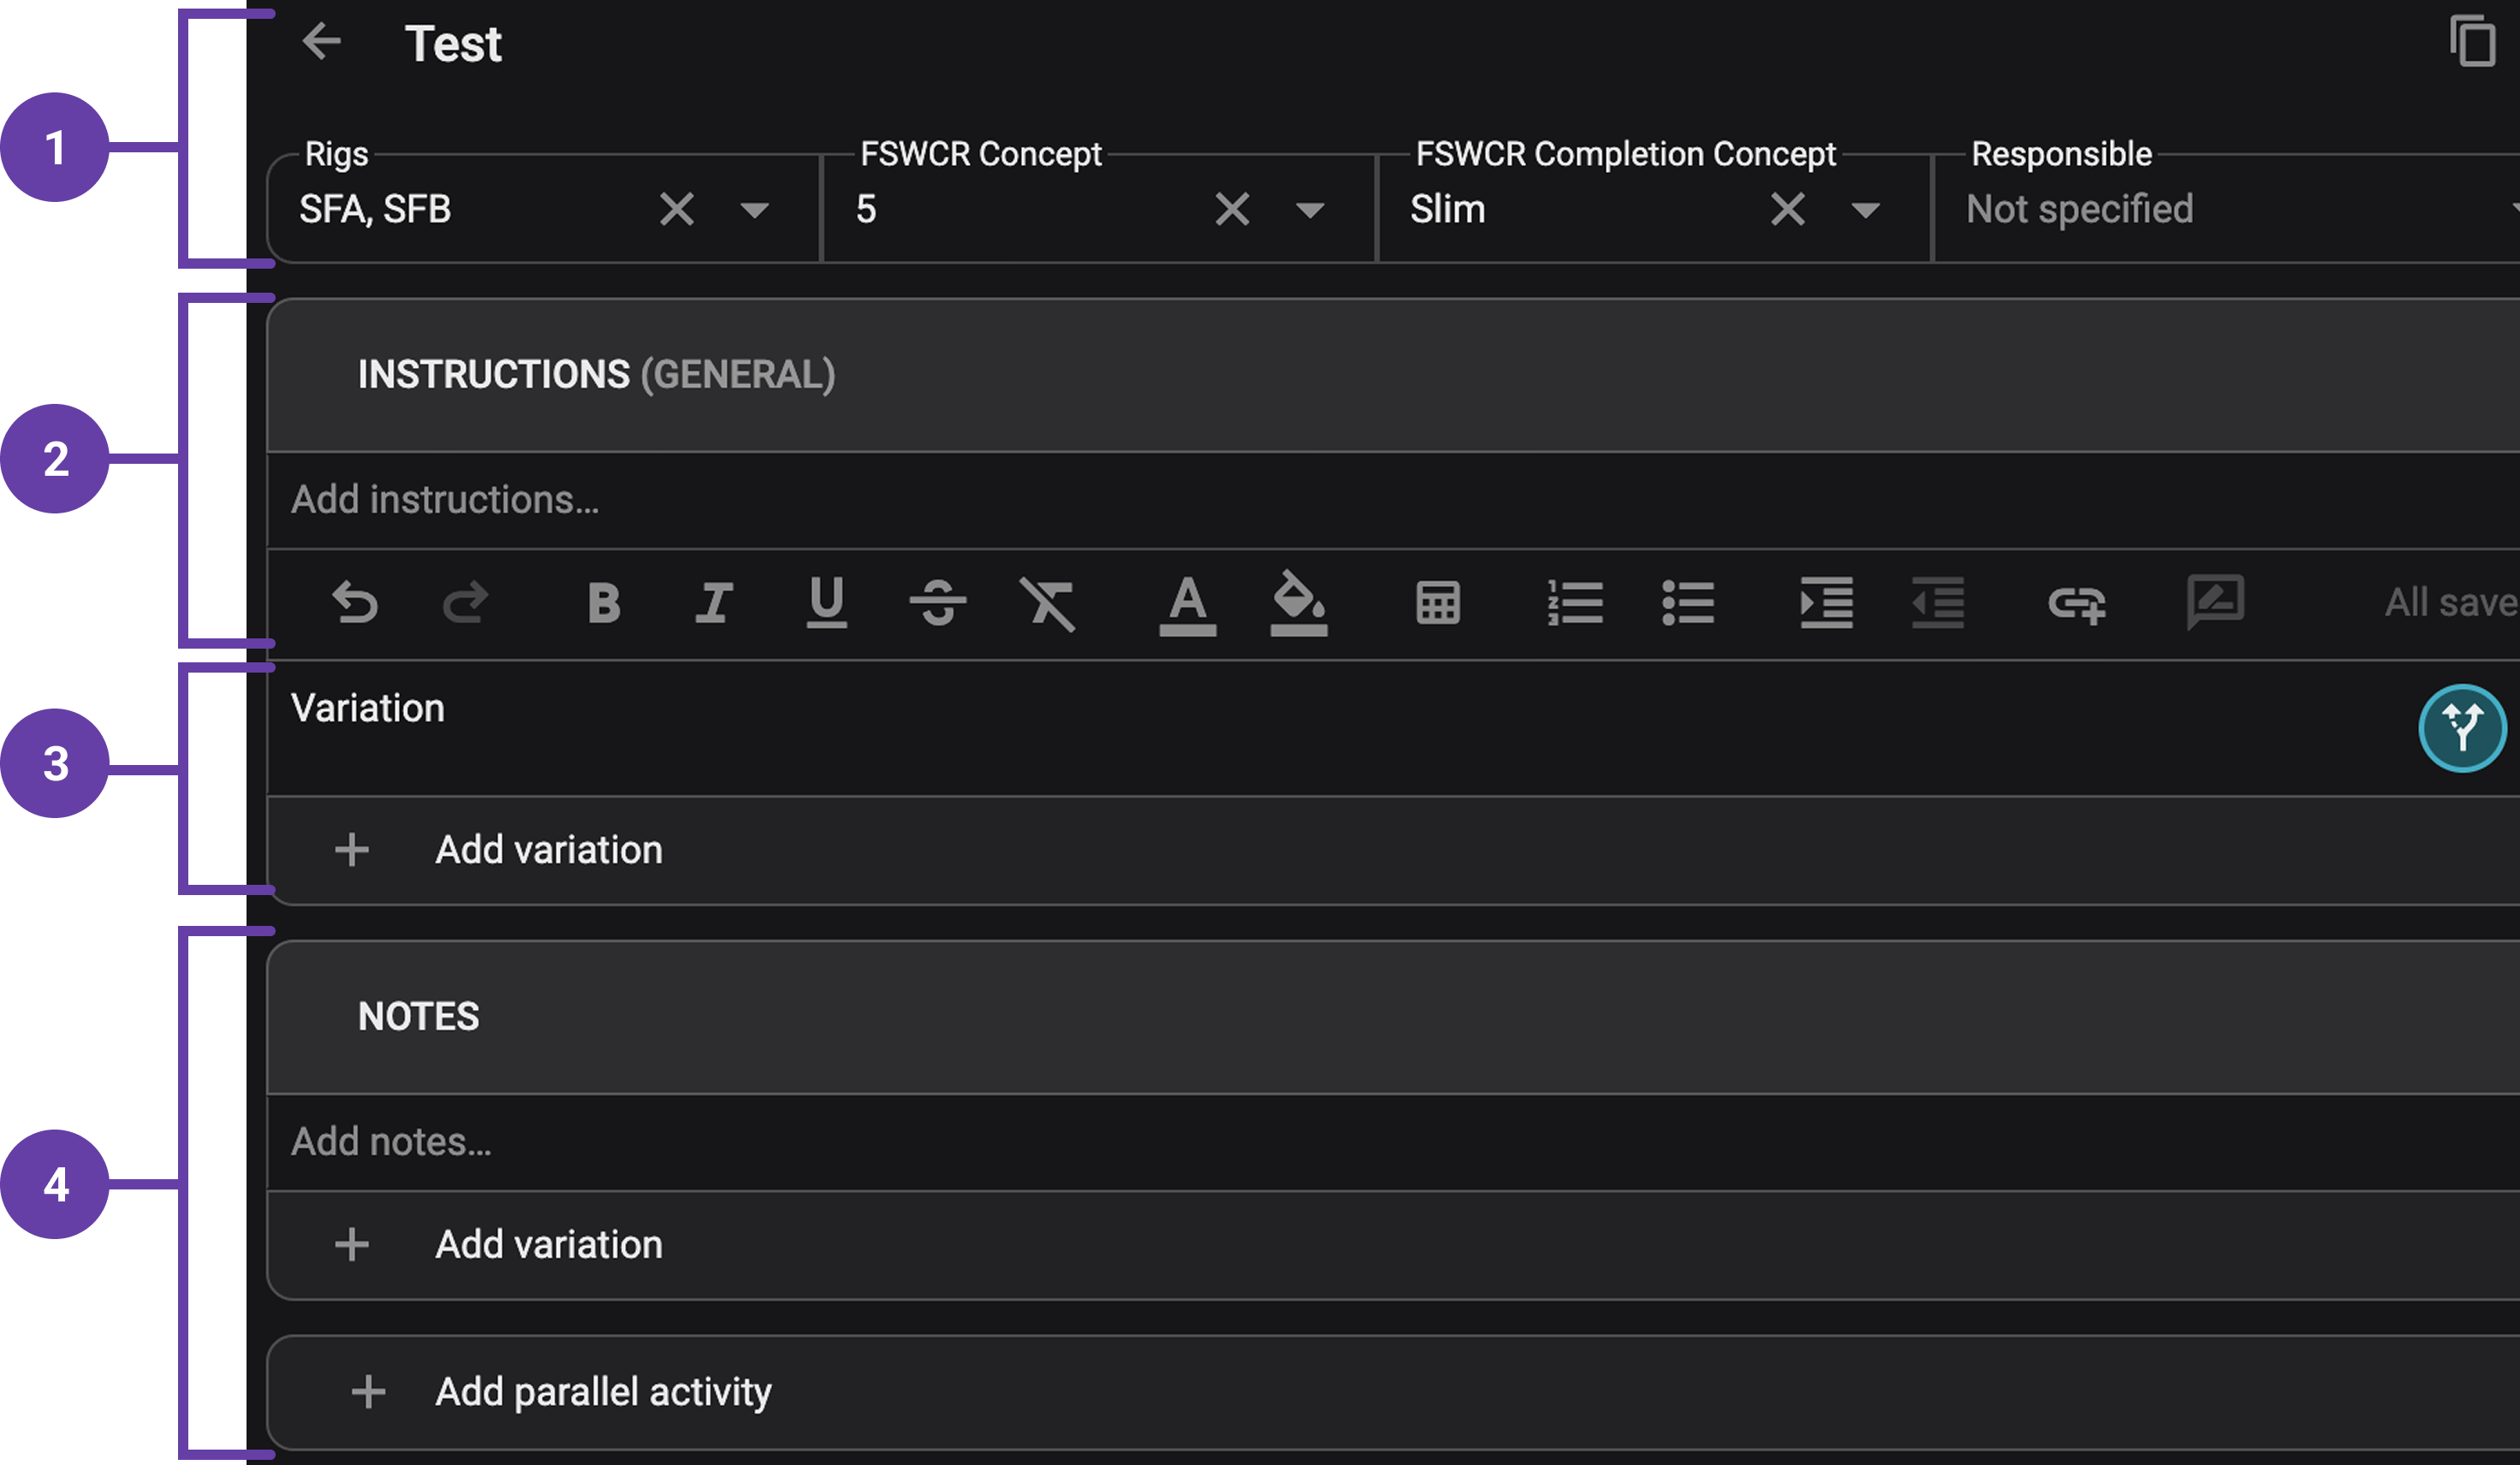
Header: Displays the step name, assigned variations, and responsible.
Instruction Editor: Editable text field where procedural details are entered and formatted.
Variation: Indicates if variations are applied and allows you to set different instructions for well concepts or rigs.
Step Components Panel: Options to add:
Parallel Activities - for simultaneous tasks.
Report Back Fields - to collect feedback from rig personnel.
Operational Parameters - target values, min/max limits.
Risks & Mitigations - for hazard identification and response planning.
Step-by-step instructions
Opening a Template in the Editor
Select a run: Navigate to
 Templates overview on the Left sidebar. Once there, expand a section and select a run.
Open the Template Editor: Click on the
Open in Template Editor icon to access the editable template view.
Editing a Template
Navigate the template editor: Once inside the editor, all imported tasks from the third-party integration will be displayed. Integrated tasks are read-only and cannot be modified directly.
Copy and paste a step: Hover over a step and use the
Copy button, then paste it within the same template by using the paste icon.Rearrange the steps: Use the
 drag-and-drop button to rearrange steps in a template. This button will appear on the left side of a task when hovering over it.
Editing Instructions and Step Components
Add a step: Click on
Go to task and  Add step.
Modify the instruction text field: Below each task, users can add editable steps and instructions using the text editor.
Add a variation: Click Add Variation to apply well concept or rig specific instructions.
Add parallel activities: Click Add Parallel Activity to define simultaneous tasks.
Add report backs: Use Add Report Back to collect feedback (text or numeric values).
Select operational parameters: Use its corresponding add field to include parameters such as limits, targets, and units.
Include Risks & Mitigations: Click to highlight potential issues and precautions.
Managing Variations
Click the variation button: Navigate to the step level and click on the
 variations button.
Assign a variation: A modal will appear, allowing you to select variations based on well concepts or rigs.
Save the variation: Click on Set selected. to save it. Selected variations will be marked with a colored icon. You can confirm the variations by hovering over the
 icon to see the assigned categories.
Copying and Pasting Steps
Select a step: TheCopy functionality allows duplicating instructions within the templates.
Copy a step: On the selected step, click the
Copy button.Paste the step: Within the same template, hover over the area where you want to paste the step and click the
 Paste icon.
Note
Users cannot copy between templates and plans.
Reviewing and Validating
Submit the template for review: Click the
Review icon to submit the template for review.Check for validation issues: Open the
validation errors on the Right sidebar.Resolve the validation issues: Click
 Show on an error to navigate to and resolve specific issues.
Examples
Drilling Engineer: For operations on a well planned after a specific concept on Rig A, additional information is required; therefore, the step is assigned to the Well Concept and Rig A by clicking Add Variation and selecting the relevant well concept and rig.
Well Planner: Resolve a validation error by clicking the issue in the Validation Panel and entering the missing data.
plan Author: Drag and drop a task using the six-dot grip to rearrange its order within the template.
Tips and tricks
Leverage variations: Create flexible templates that adapt to different well concepts and rigs.
Organize steps effectively: Arrange steps logically to maintain clarity in execution.
Check read-only tasks: Remember that tasks imported from the third-party integration cannot be modified, only steps beneath them are editable.
Copy-paste from plans: You can copy steps and information from plans into templates, saving time by reusing existing content instead of starting from scratch.
Troubleshooting
Edit a task: Tasks imported from the third-party integration are read-only. You can only add or modify steps beneath them.
Variations not applying: Ensure that the parent step has variations set before adding variations to its child steps.