Restricted Access
 Restricted Access in RigBridge and RigFlow allows for the control of viewing sensitive data, ensuring that only authorized personnel can access or modify content. This feature is handy for limiting data visibility in scenarios where operational confidentiality is critical, such as exploration wells where information can impact financial markets.
Restricted Access can be managed at various levels, such as the event, plan, and task levels, providing flexible control over data visibility throughout the planning. Restricted Access can also be applied directly within RigFlow, ensuring consistency across both platforms for offshore drilling teams.
Warning
To view and modify the Restricted Access in the Right sidebar, you must be listed as a Team Lead under Team Members. You can learn how to add yourself to a team at Team Members.
How it looks
The Restricted Access feature is available in the Right sidebar under the Restricted Access icon. This panel allows users to control who can view or edit content related to such areas as events, plans, or tasks.
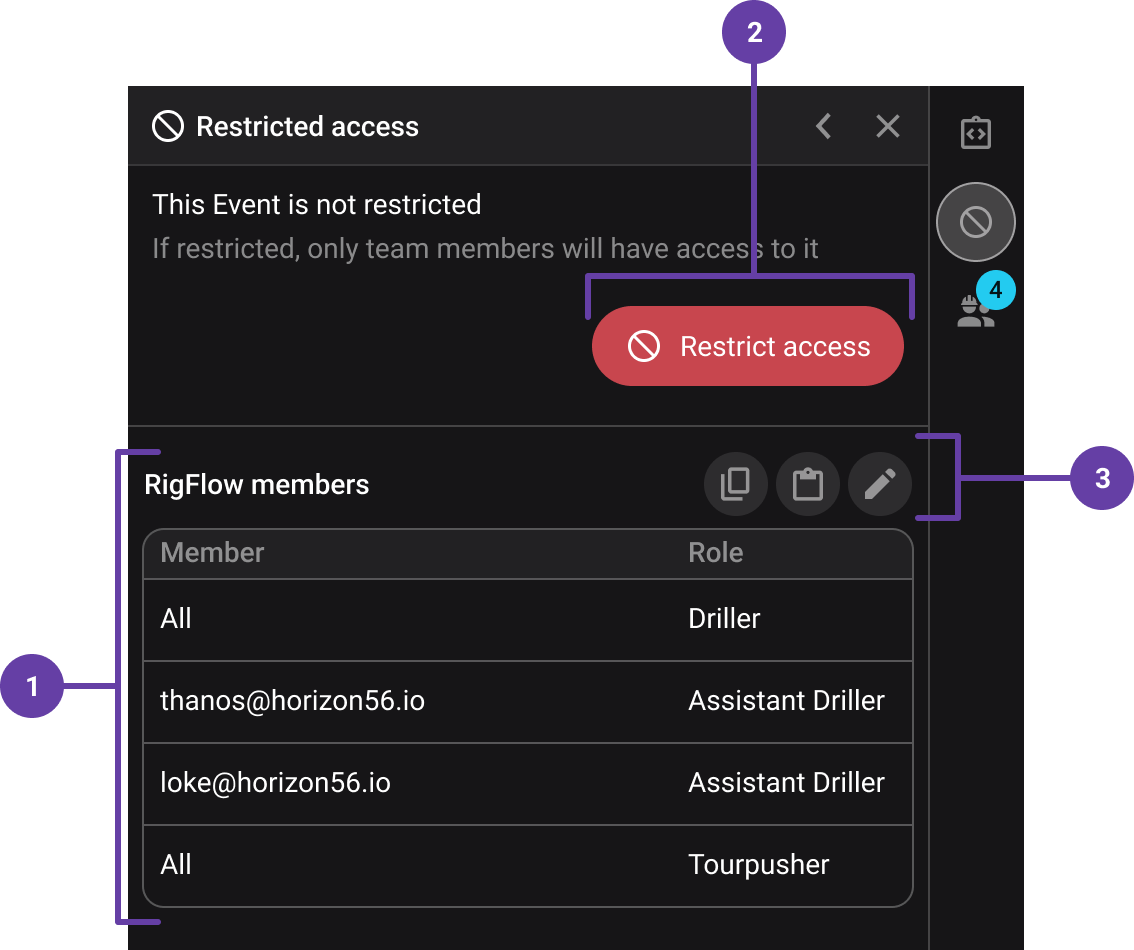
RigFlow member list: Displays all current team members with access to the selected event, plan, or task, along with their assigned roles.
"Restrict access" and "Turn restricted access OFF" buttons: The Restrict access button will show when you do not have access, while the Turn restricted access OFF button removes those restrictions, granting open access to the content.
Toolbar: The toolbar in the Restricted Access panel provides quick actions to manage the team.
 Copy: Allows you to copy an existing member list to use in another project or event.
 Paste: Enables you to paste a previously copied member list into the current project.
 Edit: Opens the member editor, allowing you to add or remove members, change roles and permissions, and modify other team-related settings.
When restricted access is applied:
Users without permission will see a restricted content notice and will be unable to access the plan's details.
Authorized users will have complete visibility and editing rights, depending on their assigned roles.
Tip
Restrictions set at the parent level, such as an event or project, are automatically applied to all child elements, like tasks or phases.
Step-by-Step Instructions
Change to restricted access
Find location: Identify the event, plan, or task where you want the restriction to be set.
Open Restricted access panel: Click the
Restricted access icon in the Right sidebar to open the panel.Add RigFlow members: Specify the members' role and, if needed, enter names or emails. Click the button Set Selected when done.
Activate restriction: Click the Restrict access button to apply the restriction.
Overview of who has access: A list of all members with access will be displayed. You can modify the list by clicking the
Edit icon. If satisfied, click the Restrict button to confirm.You will see the
Restricted Access icon next to the content you restricted, and the button in the panel will change to Turn Restricted Access OFF.
Tip
If you have integrations with existing systems, the list of members can be prefilled, reducing manual input.
Requesting access to restricted content
Identify restricted content: Users without access will see a restricted content notice instead of the plan details.
Request access: Click the Request access button displayed in the Right sidebar.
Provide reason: Add a reason for the access request (optional).
Send request: The access request will be sent to the event’s admin for approval.
You will see the Access request pending! button while awaiting approval. If needed, you can click the button at any time to cancel your access request.
Approving access requests
Receive notification: Admins will get a notification and email regarding pending access requests. Clicking the notification or email will redirect you to the Restricted Access panel for the relevant plan.
Open restricted access panel: Alternatively, you can access the panel by clicking the
Restricted access icon to view pending requests.Review Requests: Check the Member requests table to see all pending access requests.
Assign members: Assign the appropriate roles and click
 Approve to grant access or
  Reject to deny the request. You can also approve all requests at once by selecting
  Approve All.
Removing restricted access
Find location: Identify the event, plan, or task where you want to remove a restriction.
Open Restricted access panel: Click the
Restricted access icon in the Right sidebar to open the panel.Click the "Turn restricted access off" button: Remove the restriction to restore complete visibility for all team members.
Examples
Tight well operations: When drilling in a new exploration well, only key personnel should know the results due to market sensitivity.
Sensitive maintenance procedures: The Restrict access can be used during critical maintenance steps where incorrect actions could result in operational risks.
Tips and Tricks
Use Copy & Paste: If you manage multiple projects with similar teams, use the copy and paste feature for quicker setup.
Assign Proper Roles: Ensure roles are appropriately set to avoid unnecessary restrictions.