Template Activation
Templates Activation in RigBridge is a helpful feature designed to let you quickly and accurately generate new plan from existing templates. These templates are your Master plan, keeping all the important learnings and updates in one place. By activating templates, you ensure consistency across projects and save time on manual setup. This is especially useful for well planners and drilling engineers managing project operations.
How it looks
When you’re inside the Plan Overview in RigBridge and ready to activate a template, you’ll spot a  Match to RigBridge template colored icon on the right side of your project table. This icon is your starting point.

Clicking the icon opens up the Mapping plans window, where all the action happens.
Mapping plans in RigBridge window
When you open the Mapping Window, you’ll see a clear, two-sided table layout designed to help you match your plan to RigBridge templates:
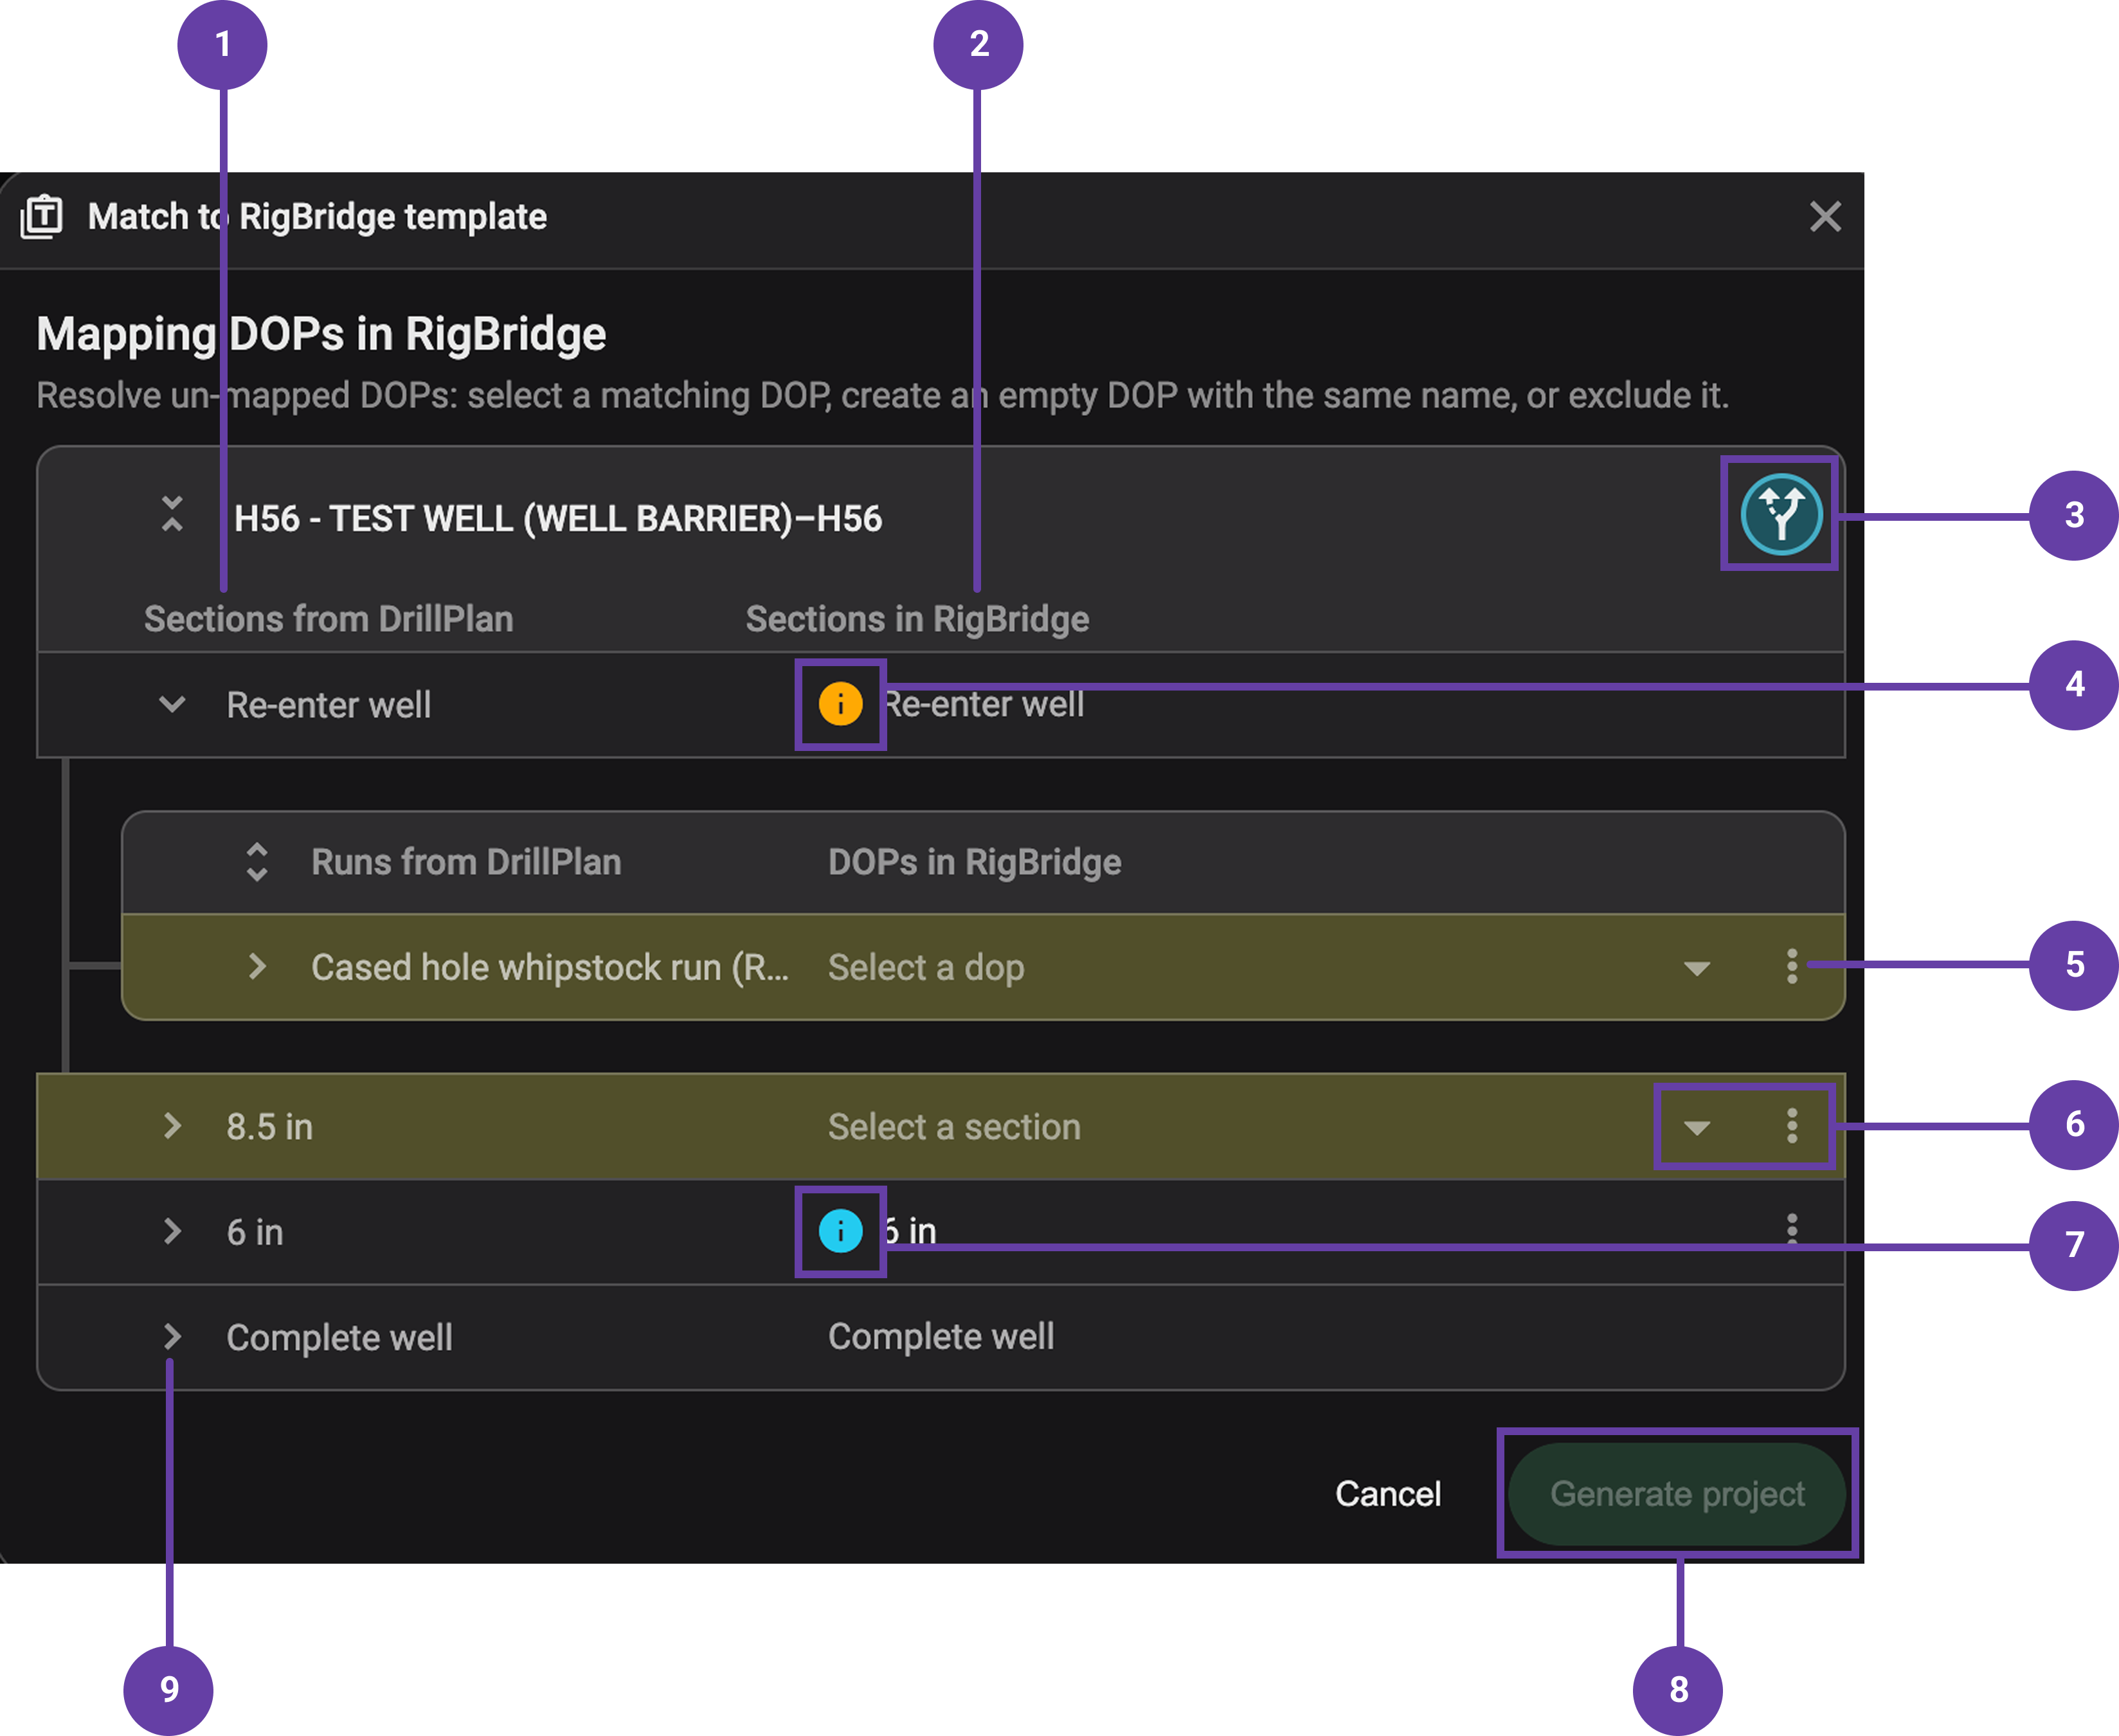
Imported plan data (Left side): This side shows all the content coming from your third-party planning tool. You’ll see the Sections, with their related Runs, and underneath, the Tasks. This is your source data, straight from the planning system.
RigBridge templates (Right side): This is where RigBridge automatically matches your plan data to existing templates:
If it finds a match, the name of the template will appear next to the corresponding item.
If no match is found, you’ll see visual indicators (yellow highlights and icons) showing where action is needed.
 Variation selection: Some projects, sections, and runs give you the option to select a variation. If the variation icon is yellow, this means a selection is required before you can proceed; once selected, the icon will change color, indicating that it’s resolved and ready.
 Yellow information icon: Found at the section level, this icon signals that RigBridge couldn’t automatically match certain runs from the integration. You will not be able to proceed until this is resolved.
Yellow highlight: Sections or runs highlighted in yellow mean they have not been matched to any template in RigBridge yet. You must resolve these before you can generate the project — the button to generate will stay disabled until you do.
 Dropdowns and
  Menus: Beside each section or run, you have tools to manually resolve issues:
- Dropdown Menu: Select an existing template manually.
- More Menu: Choose to create a new empty template, or exclude an item entirely if it’s not needed.
- Non-yellow information icon: This appears when you create a new, empty template with the same name as the run or section. You’re clear to generate the project with this icon present— it just indicates that content has been added from the integration, which was not in the template, and will be added additionally.
Generate project button: This button is at the bottom right of the window and it stays grayed out if there are unresolved mapping issues. Once all yellow indicators are cleared (and sections or runs are properly matched), the button will become clickable, allowing you to create your project plans based on the selected templates.
 Expand for more details: Click the arrow next to a section to expand and view all associated runs and tasks. This helps you see exactly what needs attention inside each section.
Step-by-step instructions
Open your project overview
Start by going to the Plan Overview in RigBridge.
Locate the project you’re working on. On the right side of the project table, you’ll see the
Match to RigBridge template icon.Hover over the icon and click on it to open the mapping window.
Review the mapping window
The window is split into two sides:
Left side: Shows all the sections, runs, and tasks imported from your planning tool.
Right side: Displays the suggested matching templates from RigBridge.
Review both carefully to understand what’s being mapped and what actions are needed.
Understanding mapping issues
When you open the mapping window, you'll need to resolve any yellow indicators before you can move forward. Here’s what they mean:
Yellow icon next to a section title: This means there are mapping issues at the run level. RigBridge couldn’t automatically match the runs from your third-party planning tool to the correct templates.
Entire section line in yellow: This signals mapping issues at the section level. RigBridge couldn’t automatically match the sections from your third-party planning tool to the correct templates.
Click the
arrow next to the section title to reveal all runs and tasks inside. This helps you see exactly which items need your attention.
Resolving mapping issues
You can choose between three different options to resolve issues:
Select an existing template: Click the
dropdown menu next to the item. Manually choose the correct section or template from the list of available, published templates in RigBridge.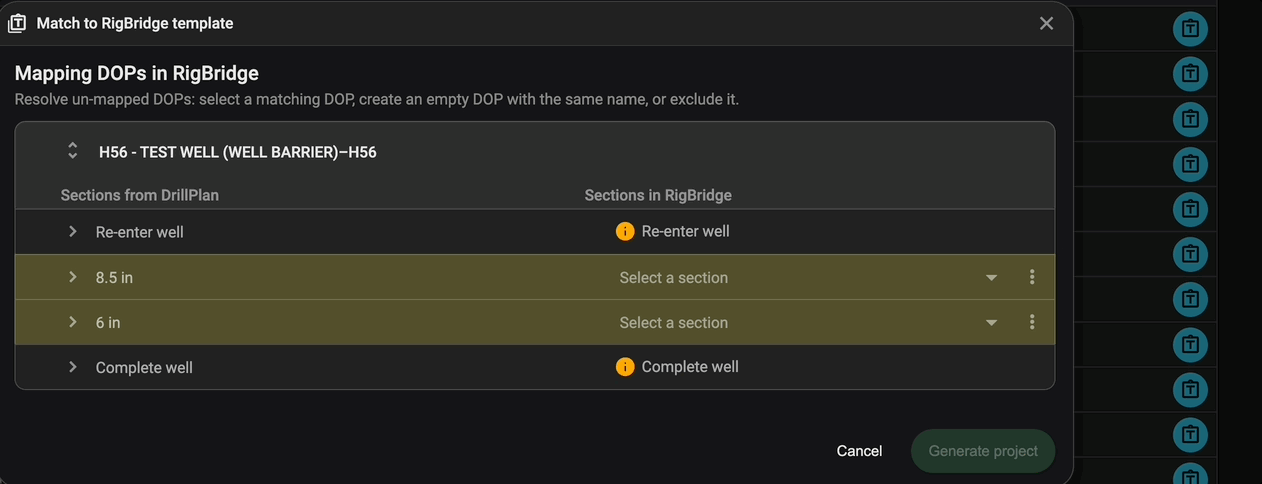
Create a new section/plan: If no suitable template exists, click on the
menu icon and select the  New section/plan with the same name option. It creates an empty, structured section that you can fill in later.
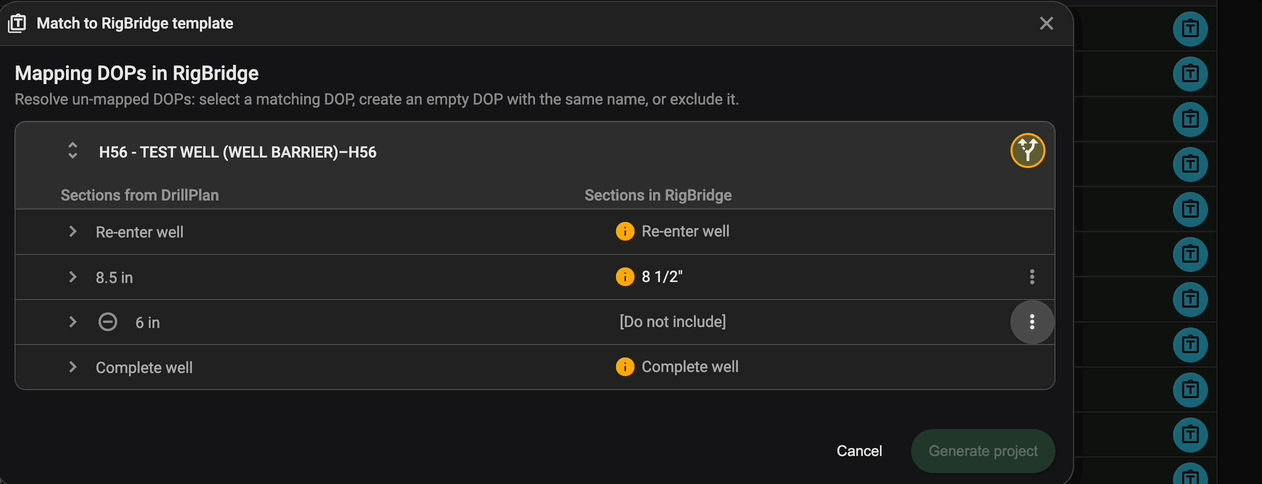
Exclude the section or run: If the section or run isn’t needed for this project, you can choose to exclude it entirely. Use the
menu and select  Do not include this section/run.
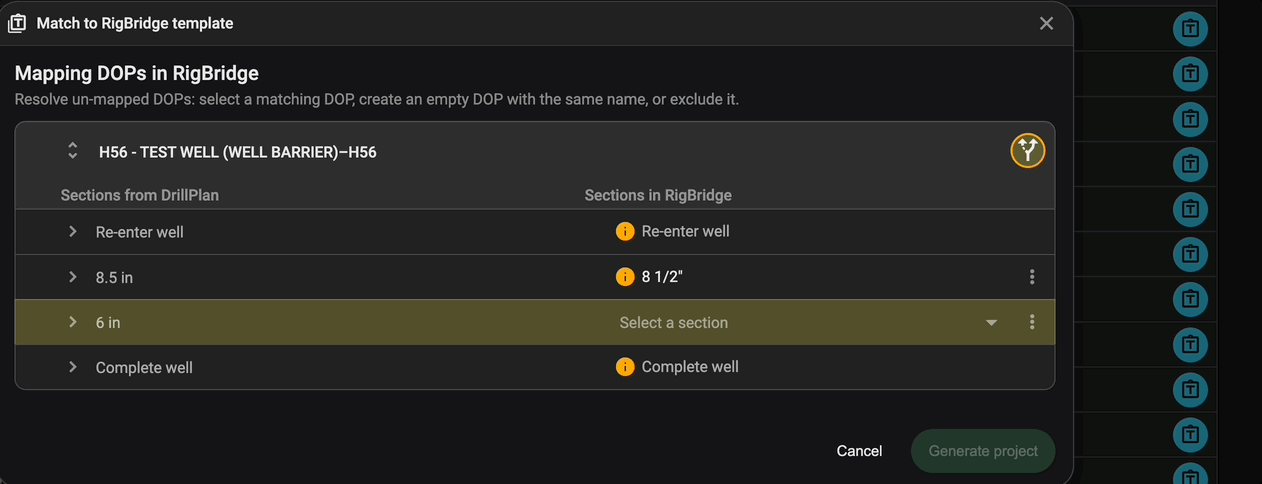
Yellow markers at both the section and run levels must be cleared before you can proceed to generate the project.
Select variations
Some sections and runs give you the option to select a variation. If the variation icon is yellow, this means a selection is required before you can proceed.
To resolve it on a section level, click on the
 variation icon next to its title.
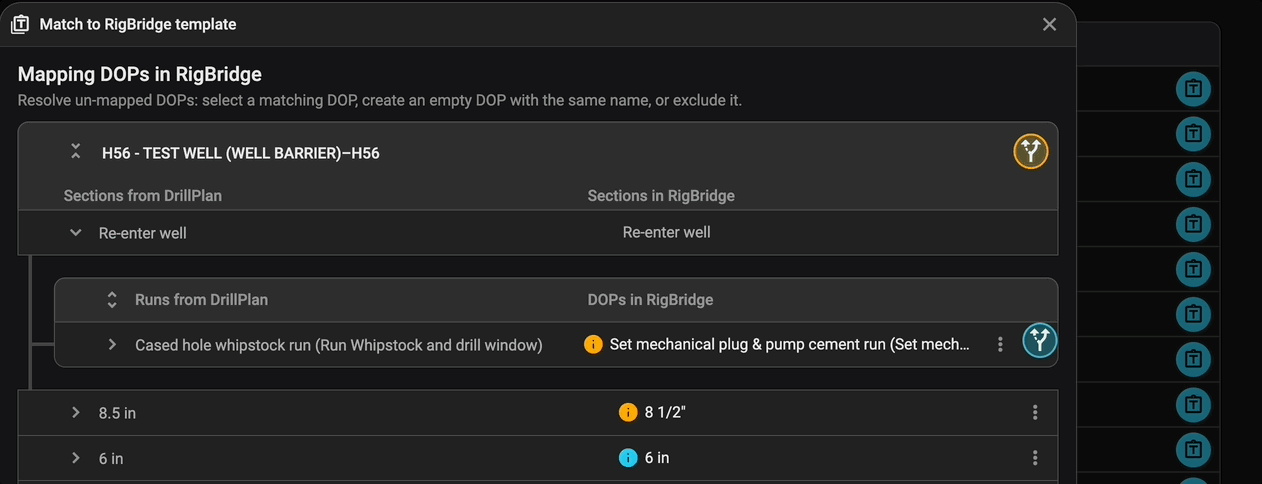
A list of available options will appear — simply choose the variation that matches your project requirements.
For each run requiring specific configurations, click the
variation icon.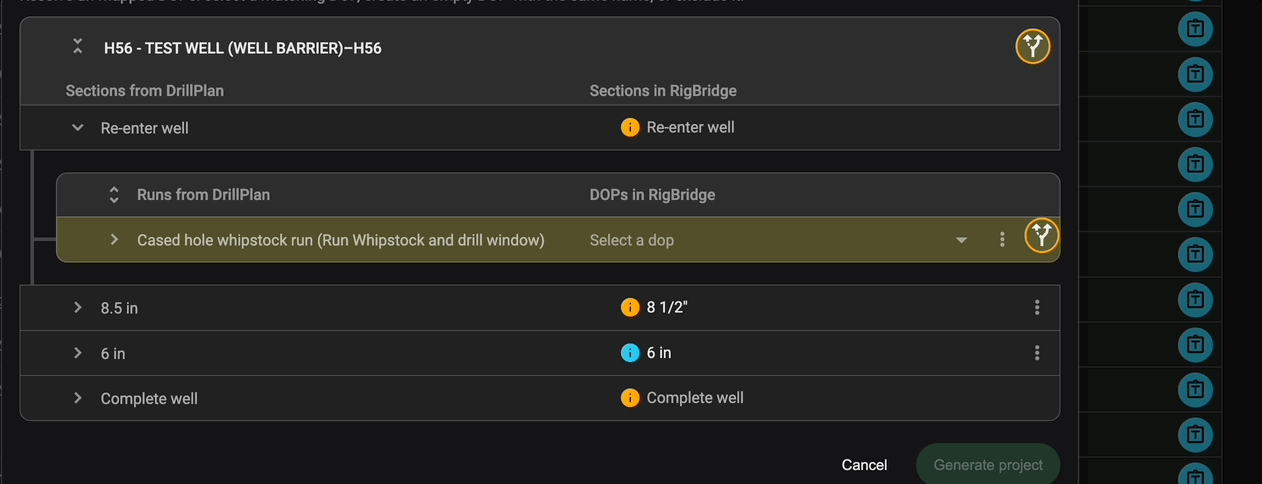
Choose the appropriate option.
Once selected, the icon will turn blue, indicating readiness.
Read more about variations here: Template Editor
Generate the project
Before proceeding, check the entire mapping window.
Confirm there are no yellow icons left. Everything should either be blue (ready) or greyed out (already completed).
Head to the bottom right of the mapping window.
If the Generate project button is active, click it to create the plan.
If it’s greyed out, return and resolve any remaining yellow icons.
Monitor project generation progress
Once you click on the Generate project button, a progress window will show the status of each plan.
If there is any failure — this usually means there was an error, and that specific template wasn’t published.
Re-open the template and check for validation errors or if all the attachments are still available.
Re-run the generation process if you republish the template. RigBridge will only create the missing plans without overwriting completed ones.
If the problem persists, contact support.
Regenerate specific plans
If you need to regenerate a plan after making changes:
Delete the existing plan in your project.
It will reappear in the mapping window, ready for recreation with the latest template updates.
Examples
Example 1: You're planning a project with an 8 1/2 inch drilling section. Select the corresponding variation to auto-populate the correct instructions and parameters.
Example 2: If a mechanical plug run doesn’t match automatically, you can manually assign it or create a new plan skeleton, ensuring no step is missed.
Tips and tricks
Deleting plans: If you need to regenerate a plan, delete the existing one first in your project. It will then reappear in the matching window.
Use shortcuts: You can delete plans quickly using the keyboard shortcut
Ctrl + Delete.Check template publishing: Ensure templates are published in the Template Library before use.
Manual section mapping: If section names differ from your template, you can manually map sections using the
dropdown or menu icon.
Troubleshooting
The Generate project button is disabled: Check for any remaining yellow indicators in the mapping window.
Templates not found: Ensure the template is published and matches exactly with planning tool entries.
Failed plan creation: Revisit the template to check for validation issues. Contact support if problems persist.
Multiple similar plans: If you have copied plans, check integration links to ensure you're editing the correct one.