User-added Properties
 User-added Properties in RigBridge let you create your own custom data fields in a plan. You can use them to capture key details—like measurements, limits, or targets—that aren’t already in the system. Once you create a property, it automatically becomes available in your plan’s References, so you can reuse it across instructions, operational parameters, and other sections. If you update the property, every place it’s used updates too, helping you keep data consistent and avoid mistakes.
How it looks

The view contains the following:
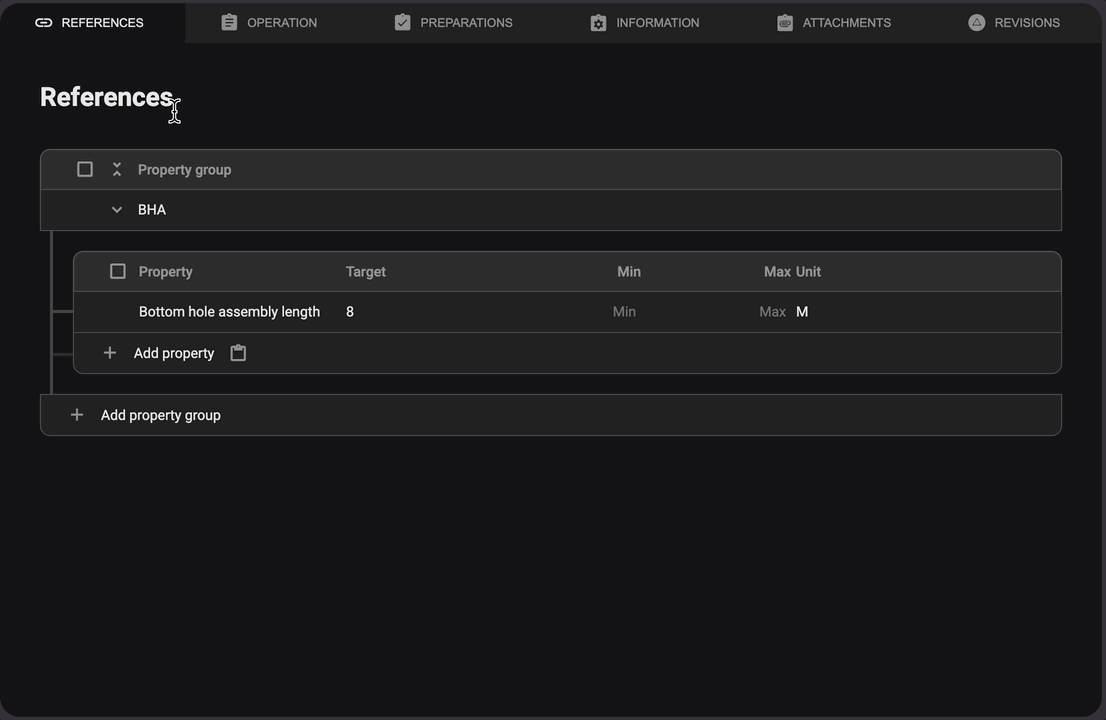
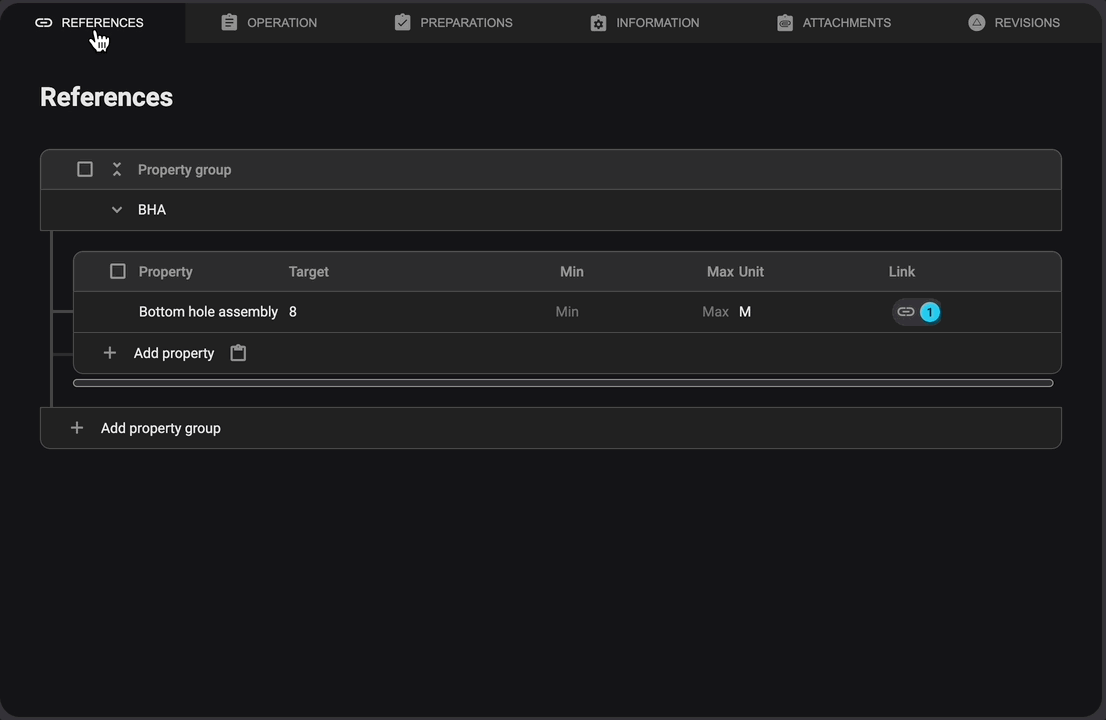
Header: Displays the chosen level and its assigned name. In this example, it indicates that we are under the Section titled Re-enter Well.
List of User-added Properties: Shows all User-added Properties under the chosen level in the Plan overview, organized into user-defined groups for better clarity and easier navigation.
Title: A name for the property to help users identify its purpose.
Target: The desired or expected measurement for a property, which can be numeric or text.
Min: The minimum allowable value for a property (numerical only).
Max: The maximum allowable value for a property (numerical only).
Unit: The measurement unit associated with the property.
Link: Displays all locations in the plan where a specific property is used. Clicking the link will show a modal window in which you can navigate to that location in the plan.
Edit properties: Allows you to add new properties, modify existing ones, or delete properties as needed. This require the right permissions.
User-added Properties can be found in multiple areas inside a plan:
Plan Editor → References tab: Displays all system-generated and user-added properties included in a given plan.
Operational parameters section: Allows properties to be used in defining drilling limits, targets, and other critical values.
Section where the text editor is available: Enables inserting user-added properties dynamically within instructions.
Whenever a user adds a property, it automatically becomes available in the References Tab, allowing for reuse and ensuring all linked sections update simultaneously if the property changes.
Step-by-Step Instructions
Create a new property
Go to a chosen level: Select the desired level in the
 Plan overview where you want to add a property.
Open properties: Click on the
 User-added Properties icon, in the right-side panel, to start adding a new property.
Create a property: Start the process of defining a new property, by clicking the
 Create property button.
If you already have user-added properties, click on the
 Edit icon to add more, then follow Steps 4 and 5 to complete the process.
Add a property group title: Click
Add property group and name the property group (e.g., "Drilling Parameters") to organize related properties.
Define property details: Click
Add property and then add fields such as Property title, Target Value (if applicable), Min/Max values (if needed), and Unit (e.g., tons, meters).
Edit an existing property
Go to a chosen level: Select the desired level in the
Plan overview where you want to edit a property.Open properties: Click on the
User-added Properties icon in the right-side panel.Edit properties: Click on the
Edit icon to open the editor.Find and modify the property: Click on the property row you want to update and adjust the Title, Target, Min/Max, or Unit values as needed.
Save Changes: Click outside row, and the property will be updated automatically.
Copy a property
Go to a chosen level: Select the desired level in the
Plan overview where you want to copy a property.Open properties: Click on the
User-added Properties icon in the right-side panel.Edit properties: Click on the
Edit icon to open the editor.Copy properties: There are two ways of copying properties.
Copy a single property: Hover over the property and click the
 Copy icon.
Copy multiple properties: Use the checkboxes to select multiple properties, then click the
Copy icon in the selection panel.
Paste in a New Location: Navigate to the section where you want to reuse the property, open User-added Properties, and click the
 Paste icon next to Add Property.
Delete a property
Go to a chosen level: Select the desired level in the
Plan overview where you want to delete a property.Open properties: Click on the
User-added Properties icon in the right-side panel.Edit properties: Click on the
Edit icon to open the editor.Delete properties: There are two ways of deleting properties.
Delete a single property: Hover over the property and click the
 Delete icon.
Delete multiple properties: Use the checkboxes to select multiple properties, then click the
Delete icon in the selection panel.
Confirm Deletion: A warning message will appear—click Delete to remove the property/properties permanently.
Add a property to a plan
You can add properties in such areas as the Operation tab (Instructions, Notes, Operational Parameters) and the Information tab.
Open the Operation Tab: Navigate to the plan view and access the Operation tab.
Find the Instruction: Identify the location within Instructions where you want to incorporate a property from the References.
Select Text or Placement: Highlight the text you want to replace with the property, or click where you want to insert it.
Open the Link Menu: In the text editor toolbar, click the Add link icon.
Choose Insert Property: Click Insert property, then search for or select the desired property.
Select Display Fields: A dialog box will appear, allowing you to toggle which fields from the property should be displayed in the instruction.
Insert the Property: Click the Insert button to apply the property to the instruction.
Confirm the Integration: The reference has been successfully added to the instruction.
Open the Operation Tab: Navigate to the plan view and access the Operation tab.
Find the Operational Parameter: Identify the location within Operation Parameters where you want to incorporate a property from the References.
Click the Title Field: Click on the Title field to open a dropdown menu.
Select a Property: Select or search for the desired property from the dropdown; this will automatically populate the remaining fields.
Confirm the Integration: The reference has been successfully added to the Operational Parameter.
Examples
Scenario: Tracking Weight Limits for Equipment
Create a Property Group: Name it "Weight Tracking" to organize related data.
Add Specific Properties: Define attributes like Max Weight (tons) and Min Safe Load (tons).
Attach Properties to Parameters: Use them in Operational Parameters for accurate tracking.
Link Inside Instructions: Ensure all relevant sections reference the correct values dynamically.
Tips and tricks
Group Related Properties: Organize similar properties under one category for easier retrieval.
Use References for Consistency: Ensure that the same values (e.g., safety limits) apply to all sections.
Update in One Place: Modify a property in the References Tab, and the change reflects everywhere it's linked.