Operation
Upon accessing a particular plan in the Plan Editor, you will be automatically directed to the Operation Overview as the default view. Here, you'll encounter a list of activities outlined within the plan.
To help you move around the plan while editing, RigBridge has a collapsible bar in the Operation tab. It includes the Task Overview, which lets you easily switch between Tasks and Steps in the plan, making it simple to review or edit information.
What is a task
Tasks are basic text fields used for grouping a collection of steps under a common heading, allowing for a quick overview. Detailed information for planned operations is found within the individual steps associated with these tasks.
What is a step
A step in RigBridge refers to a specific task or operation within a drilling plan. Each step includes detailed information like title, start/stop time, depth range, duration, instructions, comments, operational parameters, risks, warnings, report back, and reminders, along with the responsible job role.
These steps help create a digital record of the operation, with completed steps recording stop times, depths, and elapsed times. By adding and completing steps, users can monitor drilling progress and ensure tasks align with the plan.
How to use the Task overview
Once you've formulated your plan, it's time to start adding tasks and steps, essentially constructing the framework for how your plan will be presented to the offshore team.
Open the plan.
Typically, you'll land on the Task Overview upon opening the plan. If not, click the Task Overview headline located on the left side of the main Operation view.
Tip
In case the Activity Overview is collapsed and not visible, simply click the small
 right arrow icon on the left side of the main content view to expand it and make it visible again.
To add a task, click Add new task and provide a title for the task. You can add multiple tasks before proceeding to add steps.
When ready to add steps, either click on the task title in the left navigation or click the
 Go to task icon next to the task title.
Click Add new step and insert a title for the step. Assign a Responsible job role from the
 dropdown menu.
Before adding content to the step itself, you can add as many steps as needed. To add content to the step, click the
Go to step icon.You are now ready to create content for a step.
The Instructions field provides a straightforward text editor where you can input general guidance on how to execute the step using free-text format.
For more information, refer to Text Editor.
The Notes section allows you to provide additional information for the user in the RMS. Notes is a configuration that can be switched as decided by the Operator.
For more information on the text editor, refer to Text Editor.
Planned parallel activities are additional activities that are not considered main tasks or part of the critical path. These activities are typically specific tasks that can be associated with other roles within the step. Parallel activities are presented as checkboxes and should be marked as Completed by the relevant activity responsible in RigFlow when they are done.

Report Back provides two types of feedback that can be assigned to a specific user role, with the default assignment being the Step responsible.
You can provide feedback in two ways:
Number: This allows you to input numerical values (e.g., tagged 'Top of Cement')
Text: You can enter textual feedback.
To specify units, you have the option to select a unit from the drop-down list or type the required unit as free text and press [Enter].

Note
Bear in mind that the Report Back should be within the Drillers remit. If the check pertains to a service company representative, it will be more ‘visible’ as part of the written instruction.
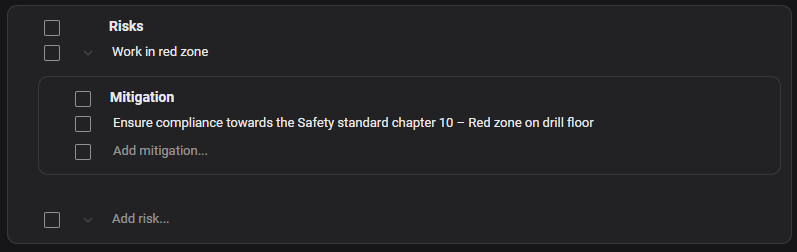
Whenever a Risk is input, the Mitigations window automatically opens. You can add multiple mitigations under one risk.
Each mitigation will show as a bullet point under its parent risk.
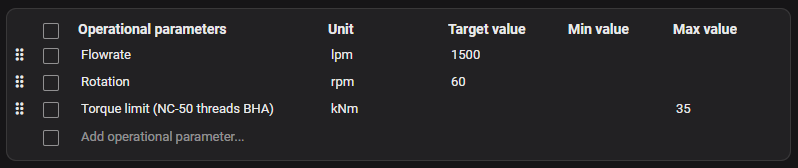
The user can input Operational Parameters, which will show as a table in RigFlow.
This table consists of five essential columns: Operational parameters (title), Unit, Target value, Min value, and Max value.
When adding a unit, a drop-down list gives an option to select units. Alternatively, you can search directly inside the unit field. If the unit is available, it should show the unit automatically. If the unit is not available, you can press [Enter] after writing the unit, and will be saved.
Note
In the "Min" and "Max" fields, only numerical values are permitted for input. However, the "Target Value" field accommodates numerical values and text entries.
For example, users can input text instructions such as "Increase flowrate in 200 lpm increments to reach maximum of xxx lpm".
Under each step you will have the ability to create a preparation. When adding the preparation under a step it will automatically get linked to the specific step. This link / reference will be visible under the Preparation Tab.

If you have earlier created a preparation that is only on Plan-level, you can select this preparation under the step by select the assigned role, and the preparation will be available in the drop-down menu under Add preparation.
