User-added Properties
User-added Properties in RigBridge allow you to customize data fields within your plans, making it easier to manage operational parameters, instructions, and references dynamically. User-added Properties and references are deeply connected - once a property is created, it can be used as a reference in multiple sections of a plan. This enables consistent data use across different operational workflows.
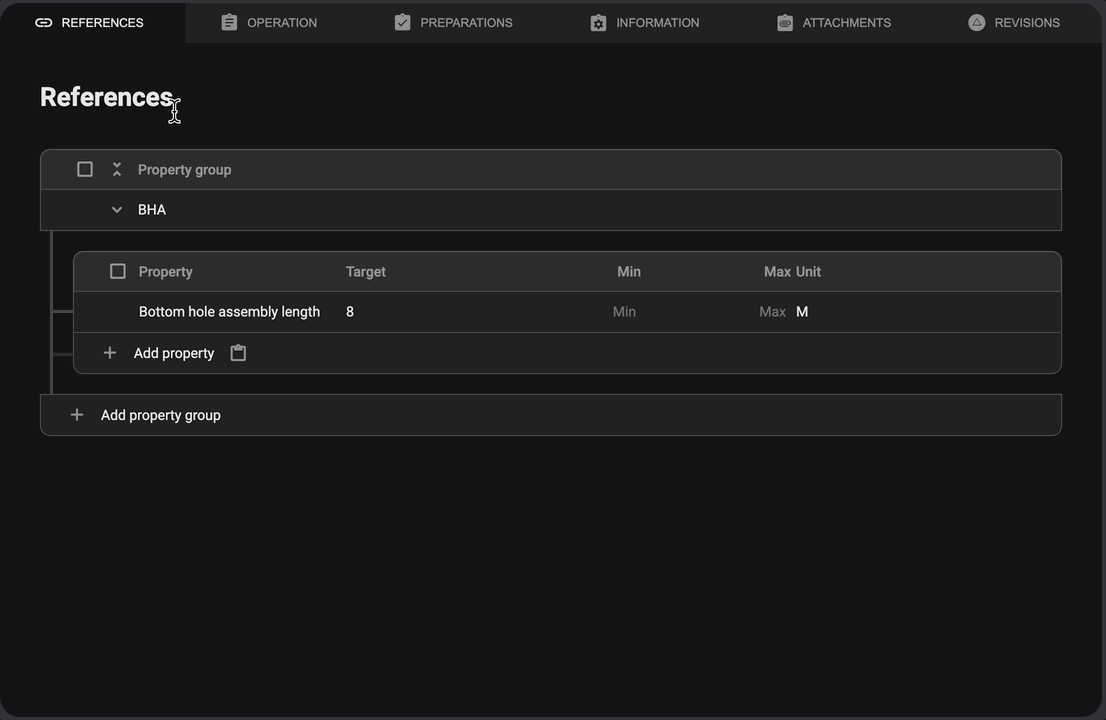
How it looks

The view contains the following:
Header: Displays the chosen level and its assigned name. In this example, it indicates that we are under the Section titled Re-enter Well.
List of User-added Properties: Shows all User-added Properties under the chosen level in the Plan overview, organized into user-defined groups for better clarity and easier navigation.
Title: A name for the property to help users identify its purpose.
Target: The desired or expected measurement for a property, which can be numeric or text.
Min: The minimum allowable value for a property (numerical only).
Max: The maximum allowable value for a property (numerical only).
Unit: The measurement unit associated with the property.
Link: Displays all locations in the plan where a specific property is used. Clicking the link will show a modal window in which you can navigate to that location in the plan.
Edit properties: Allows you to add new properties, modify existing ones, or delete properties as needed. This require the right permissions.
User-added Properties can be found in multiple areas inside a plan:
Plan Editor → References tab: Displays all system-generated and user-added properties included in a given plan.
Operational parameters section: Allows properties to be used in defining drilling limits, targets, and other critical values.
Section where the text editor is available: Enables inserting user-added properties dynamically within instructions.
Whenever a user adds a property, it automatically becomes available in the References Tab, allowing for reuse and ensuring all linked sections update simultaneously if the property changes.
Step-by-Step Instructions
Create a new property
Go to a chosen level: Select the desired level in the
 Plan overview where you want to add a property.
Open properties: Click on the
 User-added Properties icon, in the right-side panel, to start adding a new property.
Create a property: Start the process of defining a new property, by clicking the
 Create property button.
If you already have user-added properties, click on the
 Edit icon to add more, then follow Steps 4 and 5 to complete the process.
Add a property group title: Click
Add property group and name the property group (e.g., "Drilling Parameters") to organize related properties.
Define property details: Click
Add property and then add fields such as Property title, Target Value (if applicable), Min/Max values (if needed), and Unit (e.g., tons, meters).
Edit an existing property
Go to a chosen level: Select the desired level in the
Plan overview where you want to edit a property.Open properties: Click on the
User-added Properties icon in the right-side panel.Edit properties: Click on the
Edit icon to open the editor.Find and modify the property: Click on the property row you want to update and adjust the Title, Target, Min/Max, or Unit values as needed.
Save Changes: Click outside row, and the property will be updated automatically.
Copy a property
Go to a chosen level: Select the desired level in the
Plan overview where you want to copy a property.Open properties: Click on the
User-added Properties icon in the right-side panel.Edit properties: Click on the
Edit icon to open the editor.Copy properties: There are two ways of copying properties.
Copy a single property: Hover over the property and click the
 Copy icon.
Copy multiple properties: Use the checkboxes to select multiple properties, then click the
Copy icon in the selection panel.
Paste in a New Location: Navigate to the section where you want to reuse the property, open User-added Properties, and click the
 Paste icon next to Add Property.
Delete a property
Go to a chosen level: Select the desired level in the
Plan overview where you want to delete a property.Open properties: Click on the
User-added Properties icon in the right-side panel.Edit properties: Click on the
Edit icon to open the editor.Delete properties: There are two ways of deleting properties.
Delete a single property: Hover over the property and click the
 Delete icon.
Delete multiple properties: Use the checkboxes to select multiple properties, then click the
Delete icon in the selection panel.
Confirm Deletion: A warning message will appear—click Delete to remove the property/properties permanently.
Add a property to a plan
You can add properties in such areas as the Operation tab (Instructions, Notes, Operational Parameters) and the Information tab.
Open the Operation Tab: Navigate to the plan view and access the Operation tab.
Find the Instruction: Identify the location within Instructions where you want to incorporate a property from the References.
Select Text or Placement: Highlight the text you want to replace with the property, or click where you want to insert it.
Open the Link Menu: In the text editor toolbar, click the Add link icon.
Choose Insert Property: Click Insert property, then search for or select the desired property.
Select Display Fields: A dialog box will appear, allowing you to toggle which fields from the property should be displayed in the instruction.
Insert the Property: Click the Insert button to apply the property to the instruction.
Confirm the Integration: The reference has been successfully added to the instruction.

Open the Operation Tab: Navigate to the plan view and access the Operation tab.
Find the Operational Parameter: Identify the location within Operation Parameters where you want to incorporate a property from the References.
Click the Title Field: Click on the Title field to open a dropdown menu.
Select a Property: Select or search for the desired property from the dropdown; this will automatically populate the remaining fields.
Confirm the Integration: The reference has been successfully added to the Operational Parameter.
Examples
Scenario: Tracking Weight Limits for Equipment
Create a Property Group: Name it "Weight Tracking" to organize related data.
Add Specific Properties: Define attributes like Max Weight (tons) and Min Safe Load (tons).
Attach Properties to Parameters: Use them in Operational Parameters for accurate tracking.
Link Inside Instructions: Ensure all relevant sections reference the correct values dynamically.
Tips and tricks
Group Related Properties: Organize similar properties under one category for easier retrieval.
Use References for Consistency: Ensure that the same values (e.g., safety limits) apply to all sections.
Update in One Place: Modify a property in the References Tab, and the change reflects everywhere it's linked.