References
The  References tab in the Plan editor provides an overview of properties linked to a plan, including both system-generated and user-added properties. It also allows direct editing of some fields within the references table, improving usability and data accessibility. Initially, this tab will be blank until you add your first reference inside the plan. It's important to understand that References is an overview of the properties and user-added properties, and all properties should be added in there.
How it looks
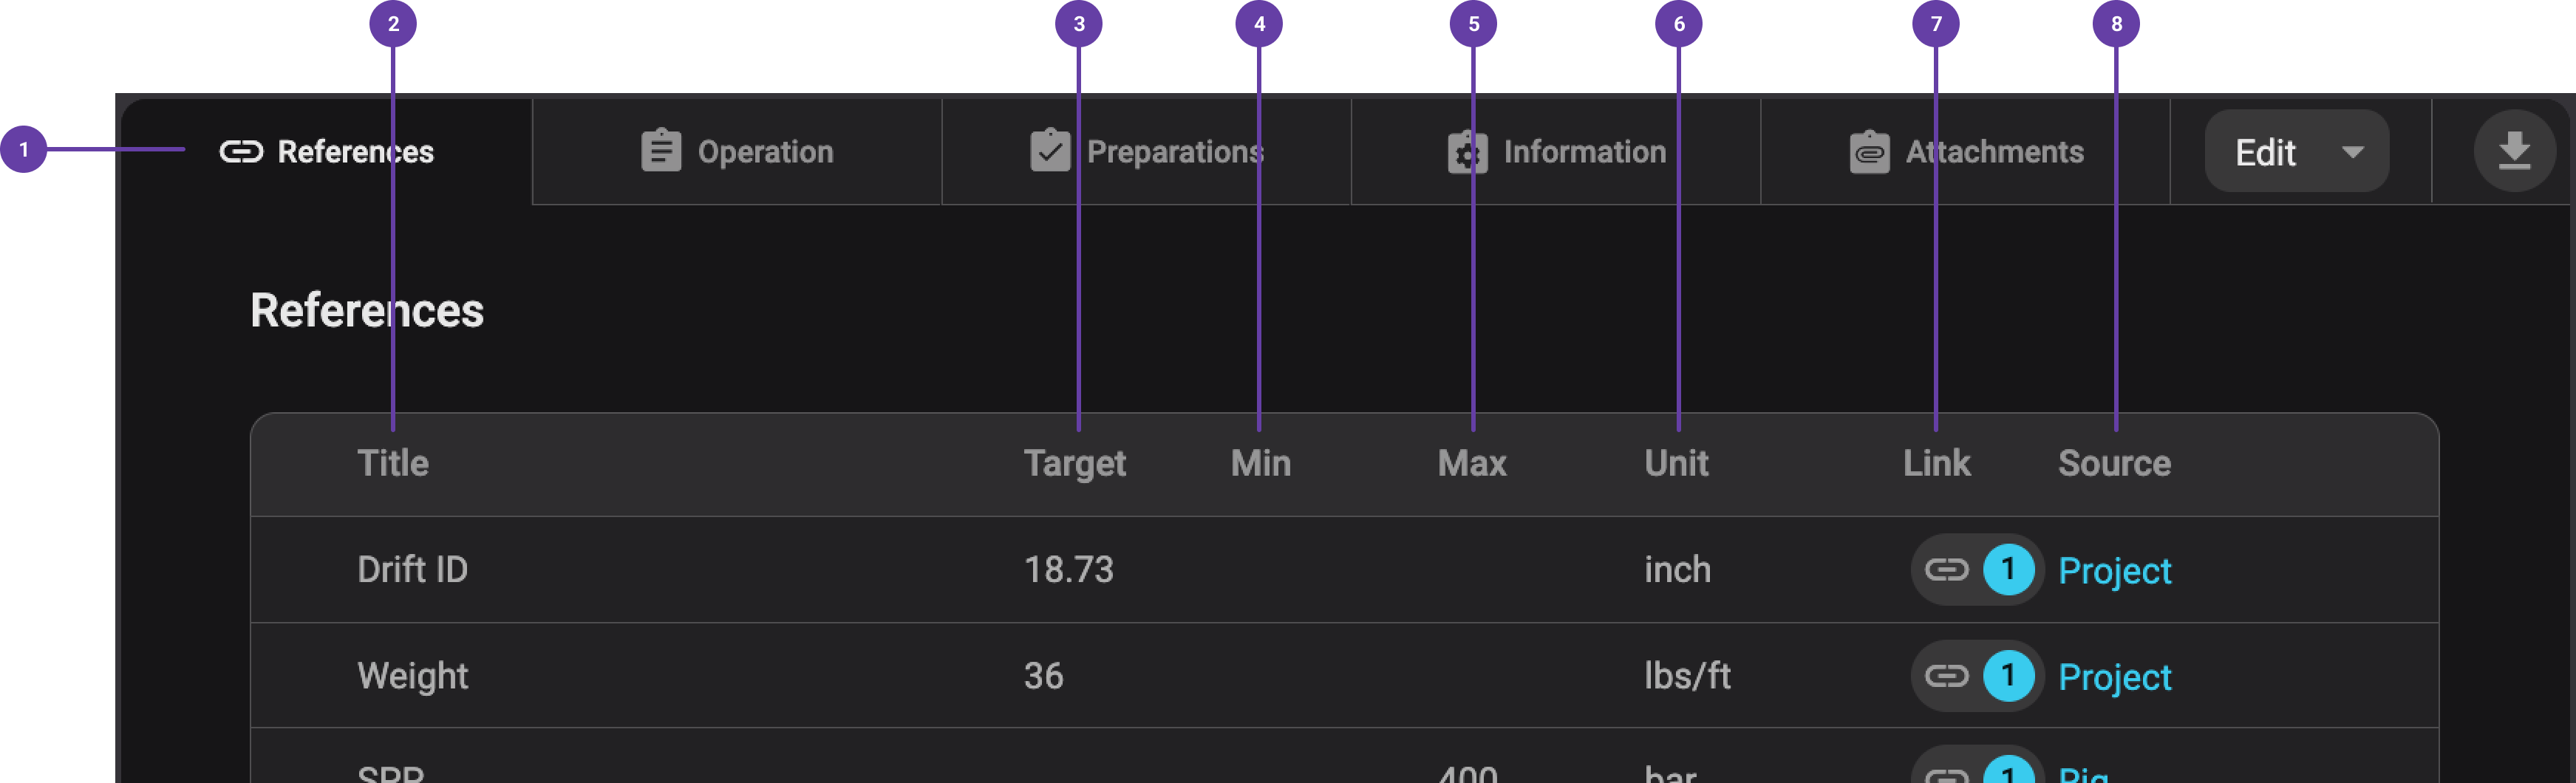
The References tab contains the following elements:
Tab with References: This tab appears only if the feature is activated in your RigBridge.
Title: A name for the property to help users identify its purpose.
Target: The desired or expected measurement for a property, which can be numeric or text.
Min: The minimum allowable value for a property (numerical only).
Max: The maximum allowable value for a property (numerical only).
Unit: The measurement unit associated with the property.
Link: Displays all locations in the plan where a specific property is used. Clicking the link will show a modal window in which you can navigate to that location in the plan.
Source: This field shows where the property originates (e.g., operation overview, third-party integration, or user-added properties).
Step-by-step instructions
How to find References
Select a plan: Open a plan in the
 Plan editor.
Open the References tab: Click on the
References tab, which is located alongside other tabs like Operation, Preparations, and Information.Manage properties: Once inside the References tab, you can view and manage the added properties.
Edit a reference
Open the Plan editor: Open the plan that contains the reference you want to edit.
Go to the References tab: Click on the References tab.
Find the reference: Hover over the reference row to reveal the
 Edit icon.
Click the Edit icon:
If the reference comes from an integration or linked property, you’ll be redirected to its source.
If it's a user-added property, you can edit it directly in the References tab. You can read more about this here: User-added Properties.
Make and save changes: Update the Title, Target, Min, Max, or Unit, then save. Changes will apply automatically.
Add a property to a plan
You can add properties in such areas as the Operation tab (Instructions, Notes, Operational Parameters) and the Information tab.
Open the Operation Tab: Navigate to the plan view and access the Operation tab.
Find the Instruction: Identify the location within Instructions where you want to incorporate a property from the References.
Select Text or Placement: Highlight the text you want to replace with the property, or click where you want to insert it.
Open the Link Menu: In the text editor toolbar, click the Add link icon.
Choose Insert Property: Click Insert property, then search for or select the desired property.
Select Display Fields: A dialog box will appear, allowing you to toggle which fields from the property should be displayed in the instruction.
Insert the Property: Click the Insert button to apply the property to the instruction.
Confirm the Integration: The reference has been successfully added to the instruction.

Open the Operation Tab: Navigate to the plan view and access the Operation tab.
Find the Operational Parameter: Identify the location within Operation Parameters where you want to incorporate a property from the References.
Click the Title Field: Click on the Title field to open a dropdown menu.
Select a Property: Select or search for the desired property from the dropdown; this will automatically populate the remaining fields.
Confirm the Integration: The reference has been successfully added to the Operational Parameter.
Tips and tricks
Use references for complex projects: Link both third-party integration properties and user-added properties. This minimizes errors by ensuring that the correct data is referenced in the plan. If a reference is updated, those changes are automatically reflected in the plan.
Regularly review references: Before finalizing a plan, verify that all linked references are accurate and up to date.
Leverage linking: Use the Link column to quickly navigate to where properties are referenced in the plan.
FAQ
Q: What happens to references when I copy a plan?
A: When you copy a plan, all references associated with it will be included in the new copy. However, references linked to a drilling plan will become inactive (greyed out) and may cause validation issues. To ensure the copied plan is valid, you will need to relink the references manually.
Q: What happens to references when a plan is approved?
A: When a plan is sent for approval, started, or active, the reference list becomes locked, preventing further modifications. However, references pulled from third-party integrations cannot be locked, as they are managed externally. These integrations typically provide stable data that does not require modifications post-approval.
Troubleshooting
Empty page issue: The References tab will remain blank until at least one reference is added to the plan. You can add references by using the Insert property under the Link content in the text editor or directly inside the Operational Parameter section under the Operation tab.